Radial Locking Plate Fixation of Distal Radius Fracture
Miguel A. Pirela-Cruz, M.D., F.A.C.S.
Professor & Chairman, Texas Tech University HSC
Paul L. Foster School of Medicine, El Paso, Texas
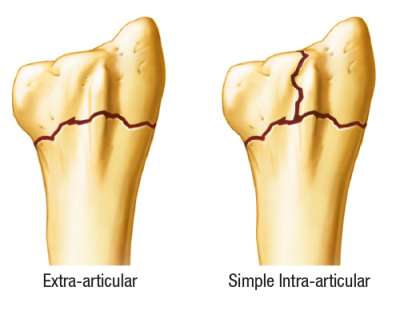
Indications
1. OTA Type A. fractures
2. OTA Type B. fractures
The primary indication for using the Radial Locking Plate is an extra-articular or simple
intra-articular fracture of the distal radius. On some rare occasions, this plate may also be used for fractures with a large styloid fragment. The assessment should be made on post-reduction radiographs. If a fracture is too distal and enough screw purchase is not possible, then another type of fixation should be utilized.
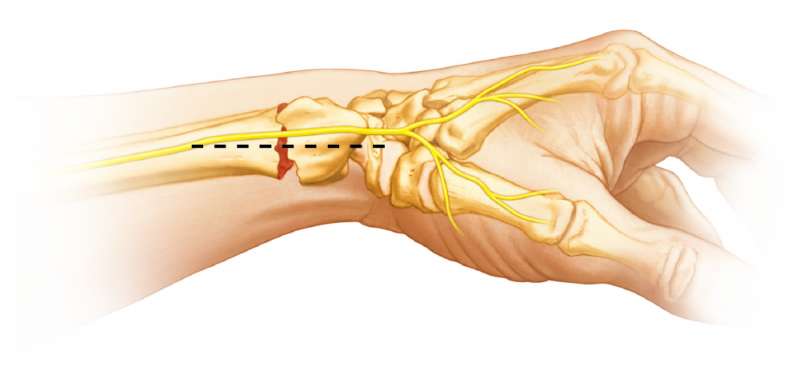
Skin Incision (Direct Radial Approach)
A linear skin incision is made along the mid axis of the forearm at the level of the wrist on the radial side.
Mobilization of the SBRN
Perhaps the most difficult aspect of this surgery is the dissection and mobilization of
the superficial branch of the radial nerve (SBRN). Meticulous surgical dissection is required to safely mobilize the SBRN. Intraoperative protection of the nerve is
also essential.
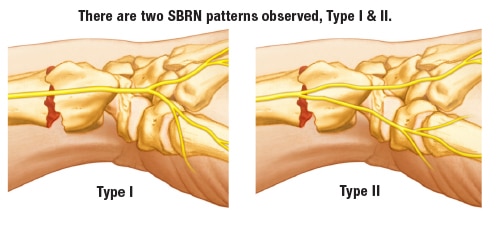
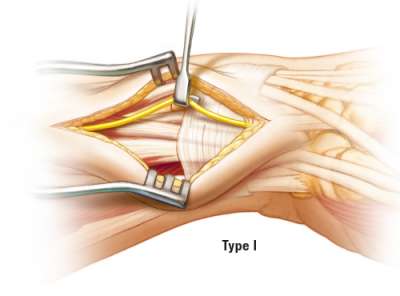
Type I Pattern
Type I has a single distal branching pattern. The SBRN is mobilized using a gentle “lift technique”. The nerve can be moved palmarly or dorsally as necessary.
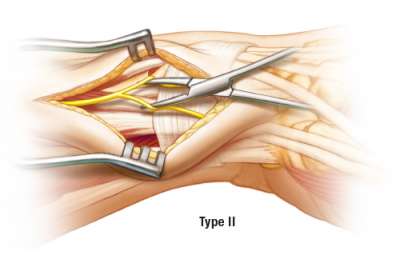
Type II Pattern
Type II has a proximal branching pattern with two distinct branches. The SBRN is mobilized using a gentle “separation technique” that involves intra-neural dissection. The nerve branches can be moved palmarly and/or dorsally to gain safe exposure of the radial side of the radius.
Note: Occasionally, the terminal branches of the Lateral Antebrachial Cutaneous Nerve (LABCN) may be encountered within the subcutaneous tissue after making the skin incision. Dissection can continue after carefully mobilizing these small branches.
Tendon Release of First Dorsal Extensor Compartment
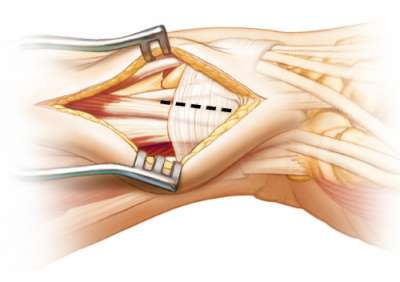
An extensive release of the APL & EPB tendons is required to allow for the plate to be placed in the appropriate position. The EPB tendon is often found in a separate compartment. This tendon must also be released. The septum (if present) between the compartment also needs to be excised. Open the 1st dorsal compartment and mobilize the APL and EPB tendons. A large penrose drain provides for protection of the tendons and allows for easy access to the distal radius.
The tendons may need to be retracted dorsally or volarly or both to address the fracture. Incise the periosteum and outline the tip of the radial styloid process. The radial styloid will help with determining the correct position of the Radial Peg Plate. Protect the radial artery in this region.
Brachioradialis Release (BR)
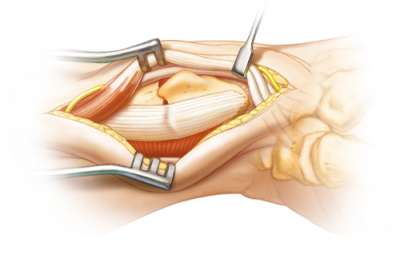
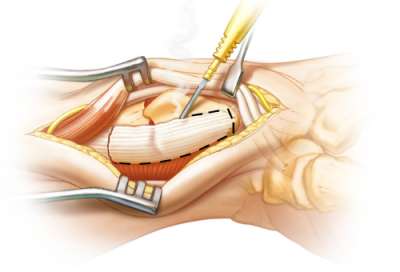
Release or excise the terminal insertion of the BR. Release the pronator quadratus (PQ) muscle off its radial attachment to allow for visualization of the volar surface of the distal radius. Now continue the dissection dorsally. The dorsal, palmar and radial surfaces of the radius are now exposed, aiding the ORIF. The PQ protects the flexor tendons.
Distal Fixation
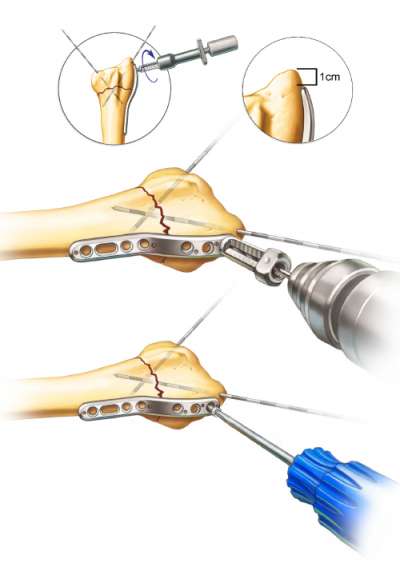
Reduce the fracture and insert crossed K-wires so that they don’t interfere with placement of the Radial Peg Plate. Apply the plate to the radius and secure with 1.1mm K-wires in most proximal and distal hole. Use distal K-wires to ensure extra-articular peg placement.
Attach peg-guide and use a 1.75mm drill to drill unicortically. Measure depth and insert distal locking peg. Repeat procedure for the other two distal holes. Initially apply distal fixation using the radial styloid for orientation and positioning of the plate.
Important Note: The distal portion of the plate should lie on the midline axis and the tip of the plate is normally placed about 1 cm from the tip of the radial styloid.
Proximal Fixation
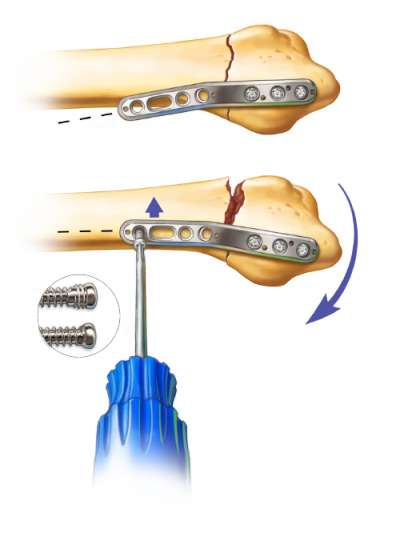
Lift the proximal end of the plate to the midline axis of the radial shaft to restore the normal palmar tilt of the articular surface. Use your thumb on the palmar side of the fracture, to maintain fracture reduction while the plate is being positioned. Attach a peg-guide and use a 1.75mm drill to drill bicortically or unicortically. Measure depth and insert proximal locking peg. Repeat procedure for the other two proximal holes.
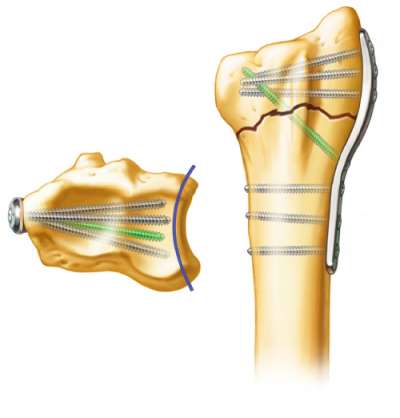
Kick-Stand Screw (shown in green)
The “kick-stand” screw is optional.
This screw can be inserted if additional fixation is required.
Pronator Quadratus (PQ) Muscle Reattachment
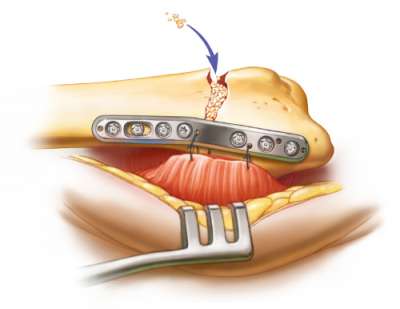
The PQ muscle can be reattached to the volar side of the radius using one or two of the empty screw or K-wire holes on the plate. Bone graft can be added if there is a large dorsal gap.
Post-Op Protocol
- Patients are usually seen back in one week.
- A removable splint is given.
- The patient is referred to hand therapy and range of motion exercises are started for the shoulder, elbow, forearm, wrist and fingers.
- Scar management and desensitization is also initiated.
- The patient can remove the splint for light activity.
- Sutures are removed in two weeks.
- Full flexion and extension of the fingers should be obtained by 3 weeks if exercises are performed correctly.
Disclosure: The author did not receive any outside funding or grants in support of this work. Neither he nor a member of his immediate family received payments or other benefits or a commitment or agreement to provide such benefits from a commercial entity.